
There are quite a few sufficient options out there already — like water cans and canisters — but those can take up a lot of space in already tight quarters. There’s always the option to mount those types of vessels on the outside of your vehicle, but you’re generally limited to how many you can mount and where.
So, why not go bigger? Why not just bolt a large water tank to your roof rack and be done with it? Seriously.
For most outdoor folks, the idea of bolting an auxiliary water tank to their vehicle is a costly convenience, but for people who are overlanding and living the van life, it’s a necessity.
There are plenty of 5-gallon or less water tanks on the market, but the one that seems best suited for the demands of life on and off the road is the WaterPORT Weekender.
With an 8-gallon capacity, the Weekender provides more than enough water for your cleaning and drinking needs for up to a week. But that second part — the fact that you can drink the water that comes out of the Weekender is a pretty big deal. The only other mainstream, large-capacity water tank on the market is the Yakima RoadShower and they don’t want you drinking that water — it’s for cleaning and washing only.
In short: For a guy like me, the WaterPORT Weekender is a nice accessory to have, but it’s not a necessity. That said, I don’t know how people who have chosen to live their lives on four wheels can get by without one. Yes, it’s an investment, but the benefits might be worth the cost.
WaterPORT Weekender Water Tank

Specs
- Tank material Food grade plastic
- Capacity 8 gal.
- Dimensions 50” x 9” x 9”
- Empty weight 26 lbs.
- Filled weight 91 lbs.
- In the box Tank, 16’ coiled hose, high-pressure spray nozzle, fill valve, mounting plates and hardware
- Price $550*
Pros
- 8 gallons of potable water on tap with you wherever you go
- Secure mounting (once you figure out how to get it mounted)
- High-pressure nozzle
- A wide assortment of accessories
- A wide assortment of replacement pieces
Cons
- If you had to choose between fighting a grizzly bear or mounting one of these things, fight the bear.
*Your vehicle may require additional mounting plates, as well as a trip to the hardware store for the necessary nuts and bolts to secure the Weekender to your rack.
WaterPORT Weekender Review
First Impressions
The Weekender is a big unit built to last. Out of the box, it comes with almost everything you need to get it mounted and set up so you can use it. I say almost everything because the mounting hardware that comes with the Weekender, as well as the available mounting kits you can purchase still might require additional hardware. We’ll get into this a little later, but this can prove to be a challenge.
Like anything made of plastic, sitting in the sun day after day, year after year will have an impact on the Weekender’s integrity, but just how long it will take to notice is anyone’s guess. Food-grade plastics are known for their resistance to changes in temperature. Just look at all those leftovers in the Tupperware that you keep pushing to the back of the fridge! So, I wouldn’t worry about it breaking down or falling apart for a few years at a minimum.
The fact you can consume the water in the tank is a big deal. So much so that it almost makes Yakima’s RoadShower irrelevant. Sure, we all need to get clean, but we need to drink water more than we need to smell nice. Additionally, these tanks aren’t cheap, so the better investment is obviously in something that can do more.
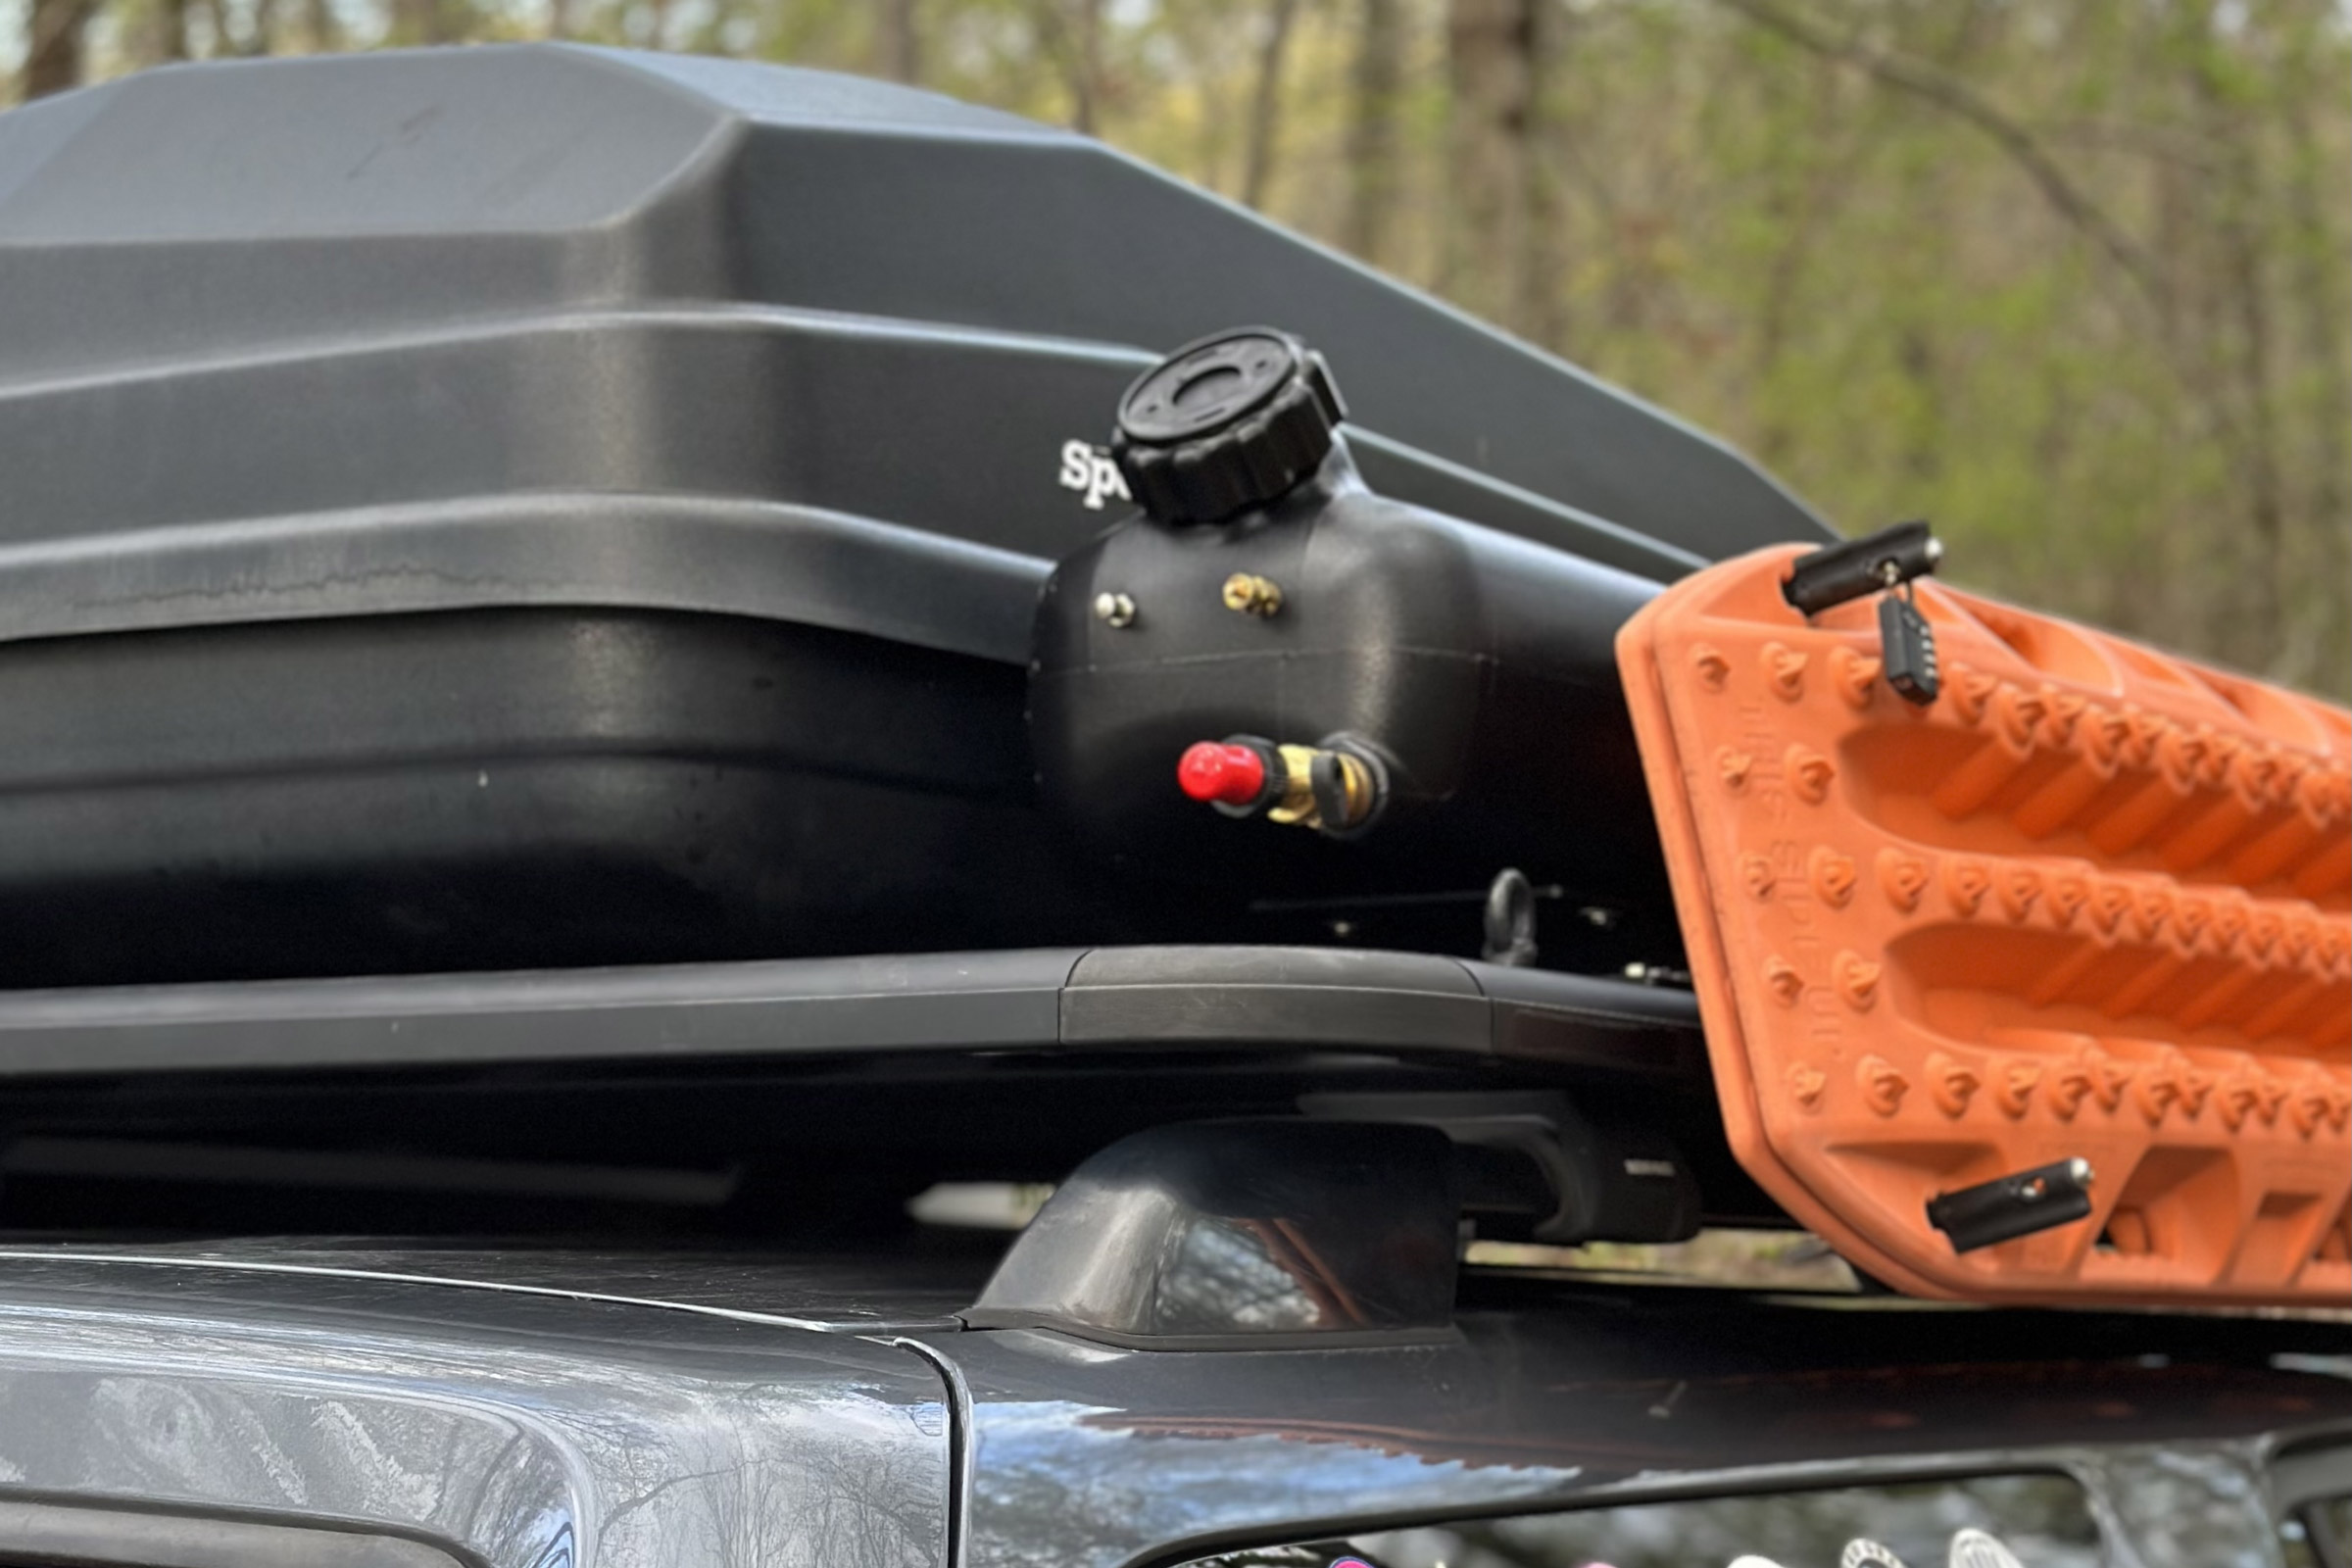
I was excited to get the Weekender up on my roof. Because there’s only a little bit of space up there, it took some time to measure everything out. But, for as big as the tank seems, it really isn’t once you put it in place. I was able to shift my cargo box over a couple of inches toward the awning and slide the unit in between that and my Maxtrax.
WaterPORT Weekender Installation
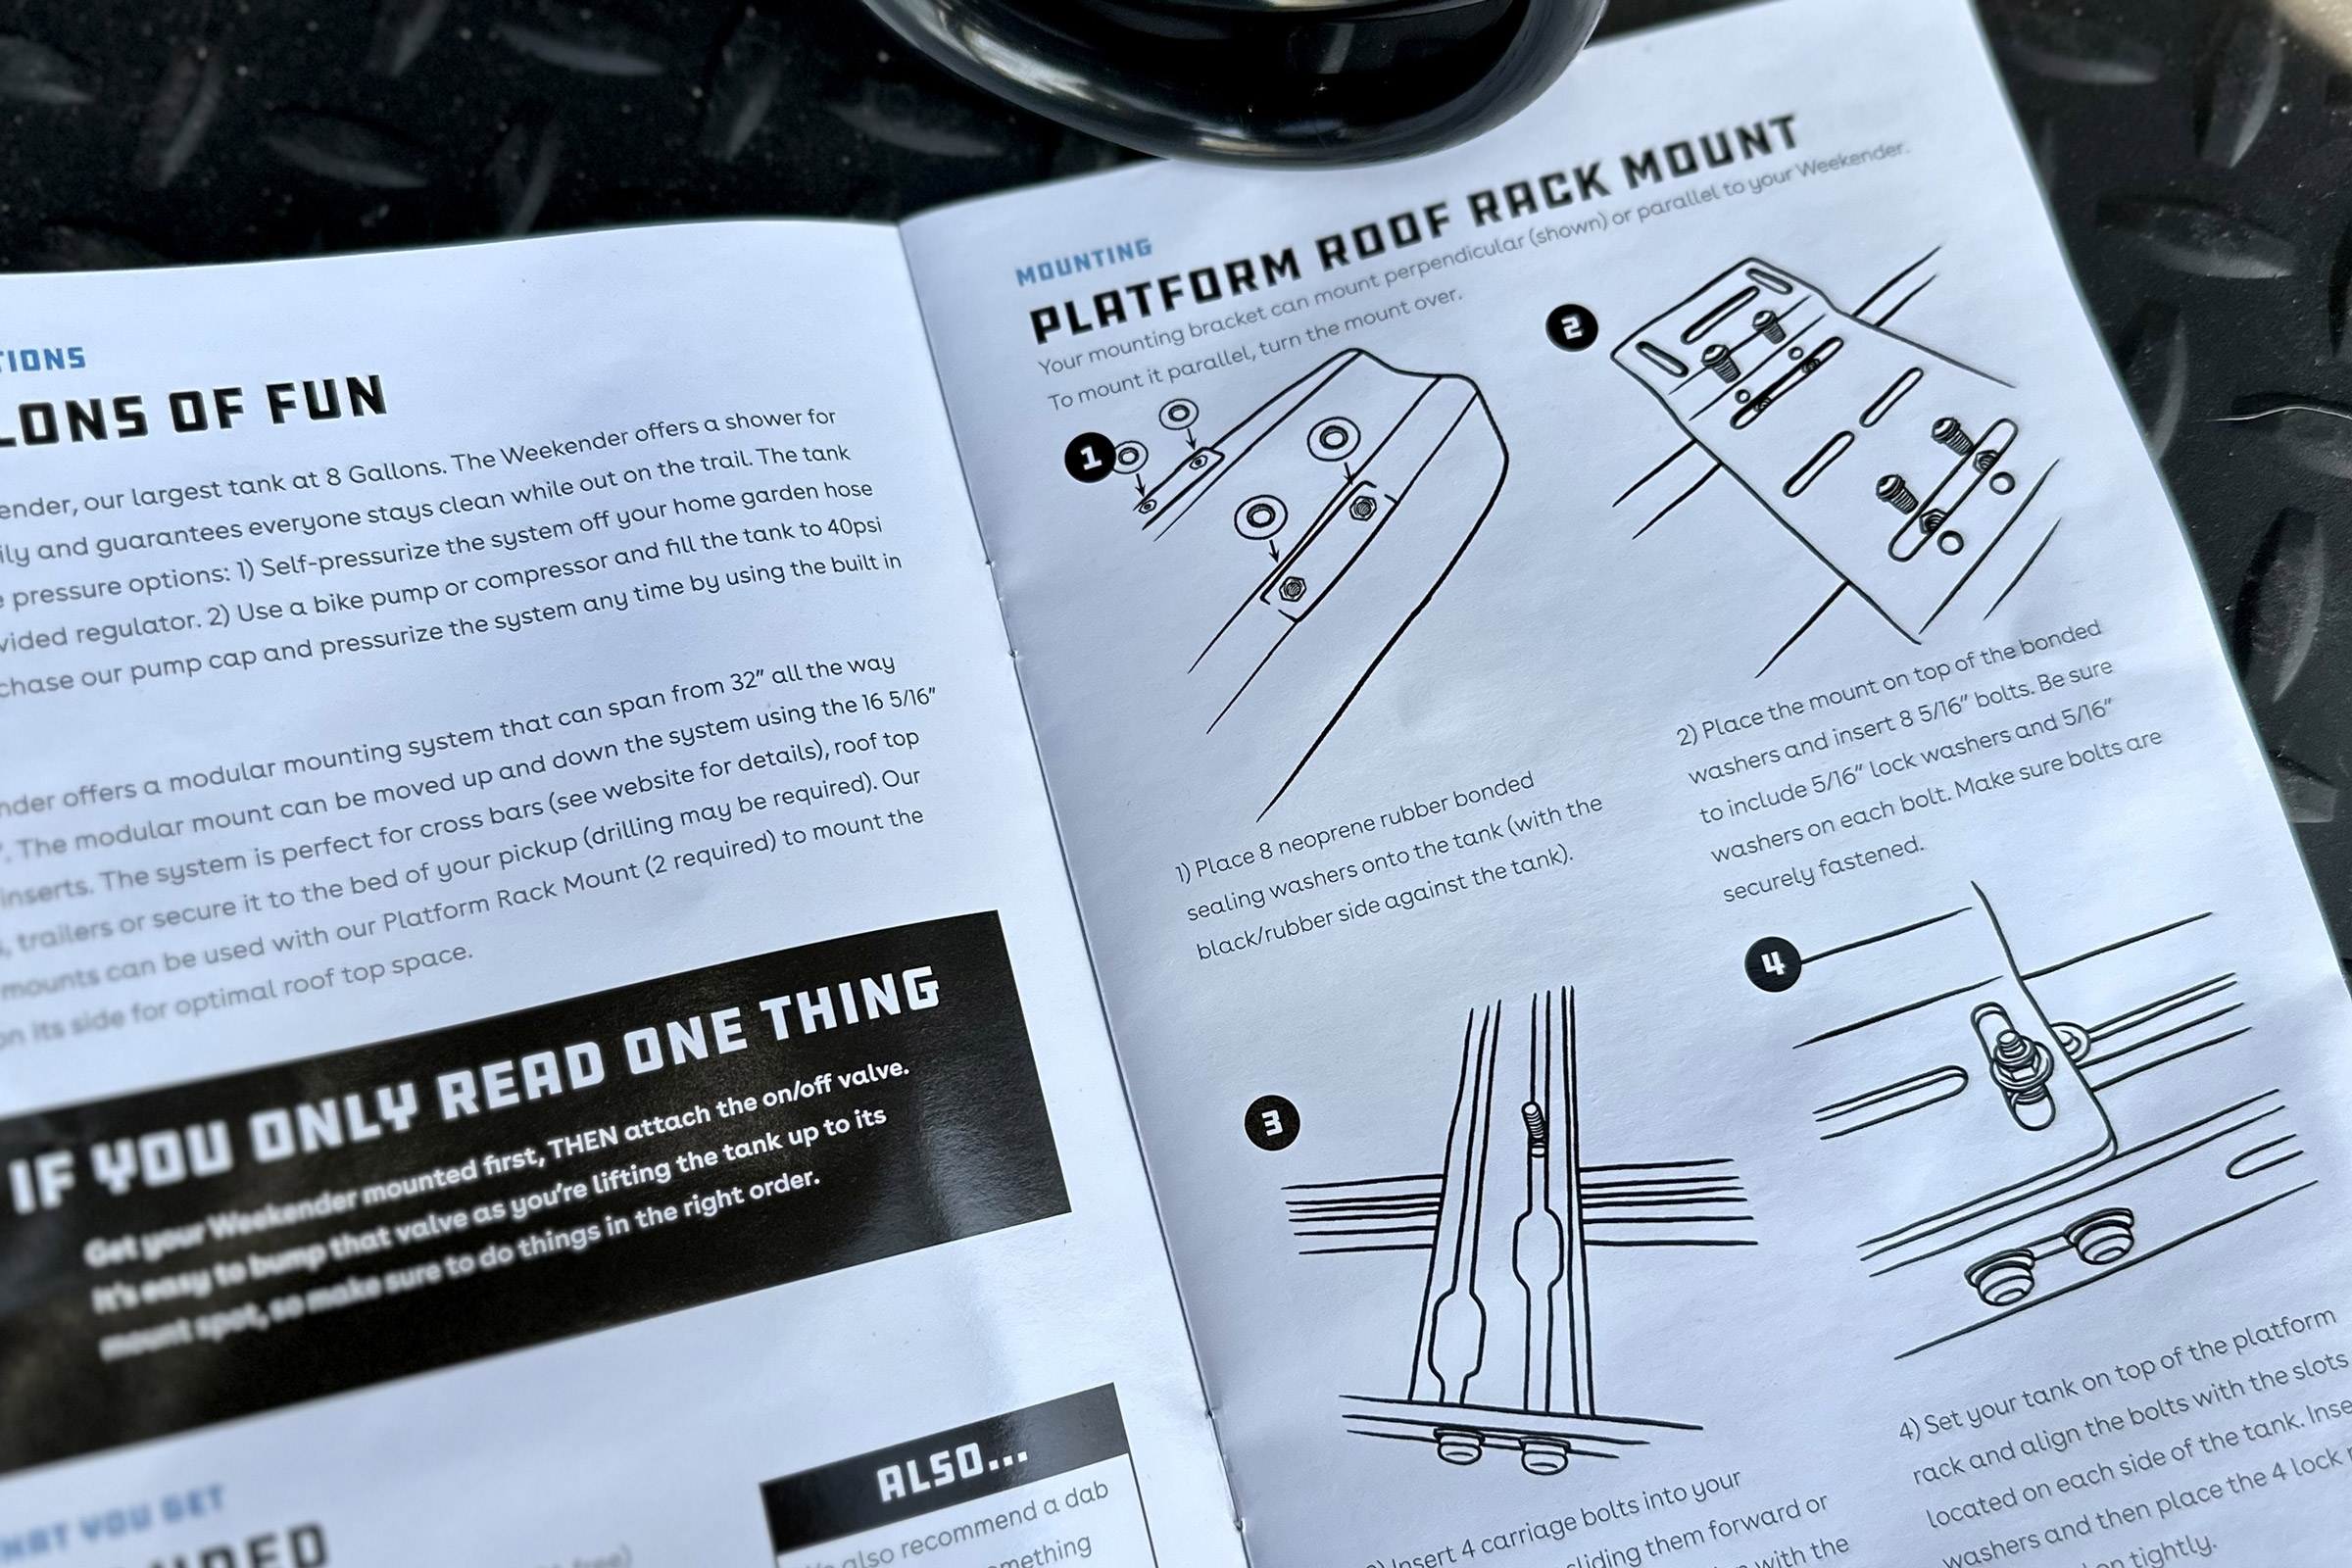
Mounting the Weekender is not intuitive, and the included instructions might as well be written in an ancient language from a lost civilization. If you’re the kind of person who needs step-by-step mounting instructions, this is not going to be fun for you. But, if you’re the kind of person who gets a kick out of cobbling things together, this is everything you’ve ever wished for.
If you have a fairly empty roof rack, finding a way to get the Weekender bolted to it should be pretty easy. But if your rack is loaded up, be prepared to have to move some things around.

I have no problem admitting that the Rhino Rack Pioneer Platform that I have on the roof of my 4Runner is not the easiest thing to mount accessories to. But when the mounting instructions for platforms clearly indicate that the mounting hardware was made for Prinsu platforms you’re in for an adventure. Thankfully, WaterPORT was happy to send me different bits and pieces to help me on my journey.
One of the sets of mounting plates WaterPORT sent me, designed specifically for platform rack mounting, could have worked if my platform didn’t have anything else on it. But, with these plates, the Weekender would have had to be mounted on its side — and that didn’t feel right to me.
It felt like a lot of stress would have been put on both the channel of the platform as well as the plate itself.

Ultimately, I ended up using the original mounting plates that came with the Weekender, flipped over, and mounting hardware that I sourced from Home Depot.
Big tip here: If you need to source your own hardware, make sure it is stainless. I cannot stress this enough.

Beyond platform mounting, after doing some research online, it seems like folks with standard factory or aftermarket crossbars should have an easy go at getting the Weekender mounted. I’m going to go out on a limb here and recommend you keep an open mind and be prepared to hit up your local hardware store for the right hardware.
My 10 years of experience in designing mounting hardware for racks came in handy here. It’s one of those things where things can go sideways quickly — especially when you get out on the road with a loaded tank. So, by all means, contact WaterPORT if you have any questions here.
Other WaterPORT Mounting Options
Although a majority of the people who own the Weekender will probably mount it to their roof rack, there is a hitch mount option. I think this is the way to go for people who don’t need the tank all the time or who are looking for a different option to keep it off the roof of their vehicle.
There’s also a bed rack under mount, which is designed to mount to truck bed racks on the belly of the bar instead of on top of it. This is a pretty wild design, as it utilizes the empty space under the rack that usually doesn’t get used. This is valuable space if you have a lot of gear.
These options are an added expense, as are some other alternative options for roof mounting.
Racks in general are expensive, so none of this should be a shock to a prospective buyer. Just keep in mind that the $550 price tag gets you the tank and everything you need to use it, not necessarily everything you need to mount it.

WaterPORT in the Field
Anything you mount to your vehicle can change the way it acts and reacts when you’re driving. Because you’re disrupting the aerodynamics of the vehicle, large accessories can impact your gas mileage as well.
I am happy to report that I haven’t seen any negative impacts of having the WaterPORT on my roof, empty and filled. I’ve got enough crap up there that it’s safe to assume that any changes in driving, handling, and gas mileage have already occurred. But it’s worth stating that the WaterPORT Weekender had zero impact on my vehicle, in my case.
Now, if you’re driving a Honda Civic and you add a 100-pound water tank to your roof, I’d bet you a dozen donuts you’re going to feel it. Especially if you’re trying to have your own little Fast and Furious moment out on the highway — ripping that e-brake like a savage — so just keep that in mind.
Filling
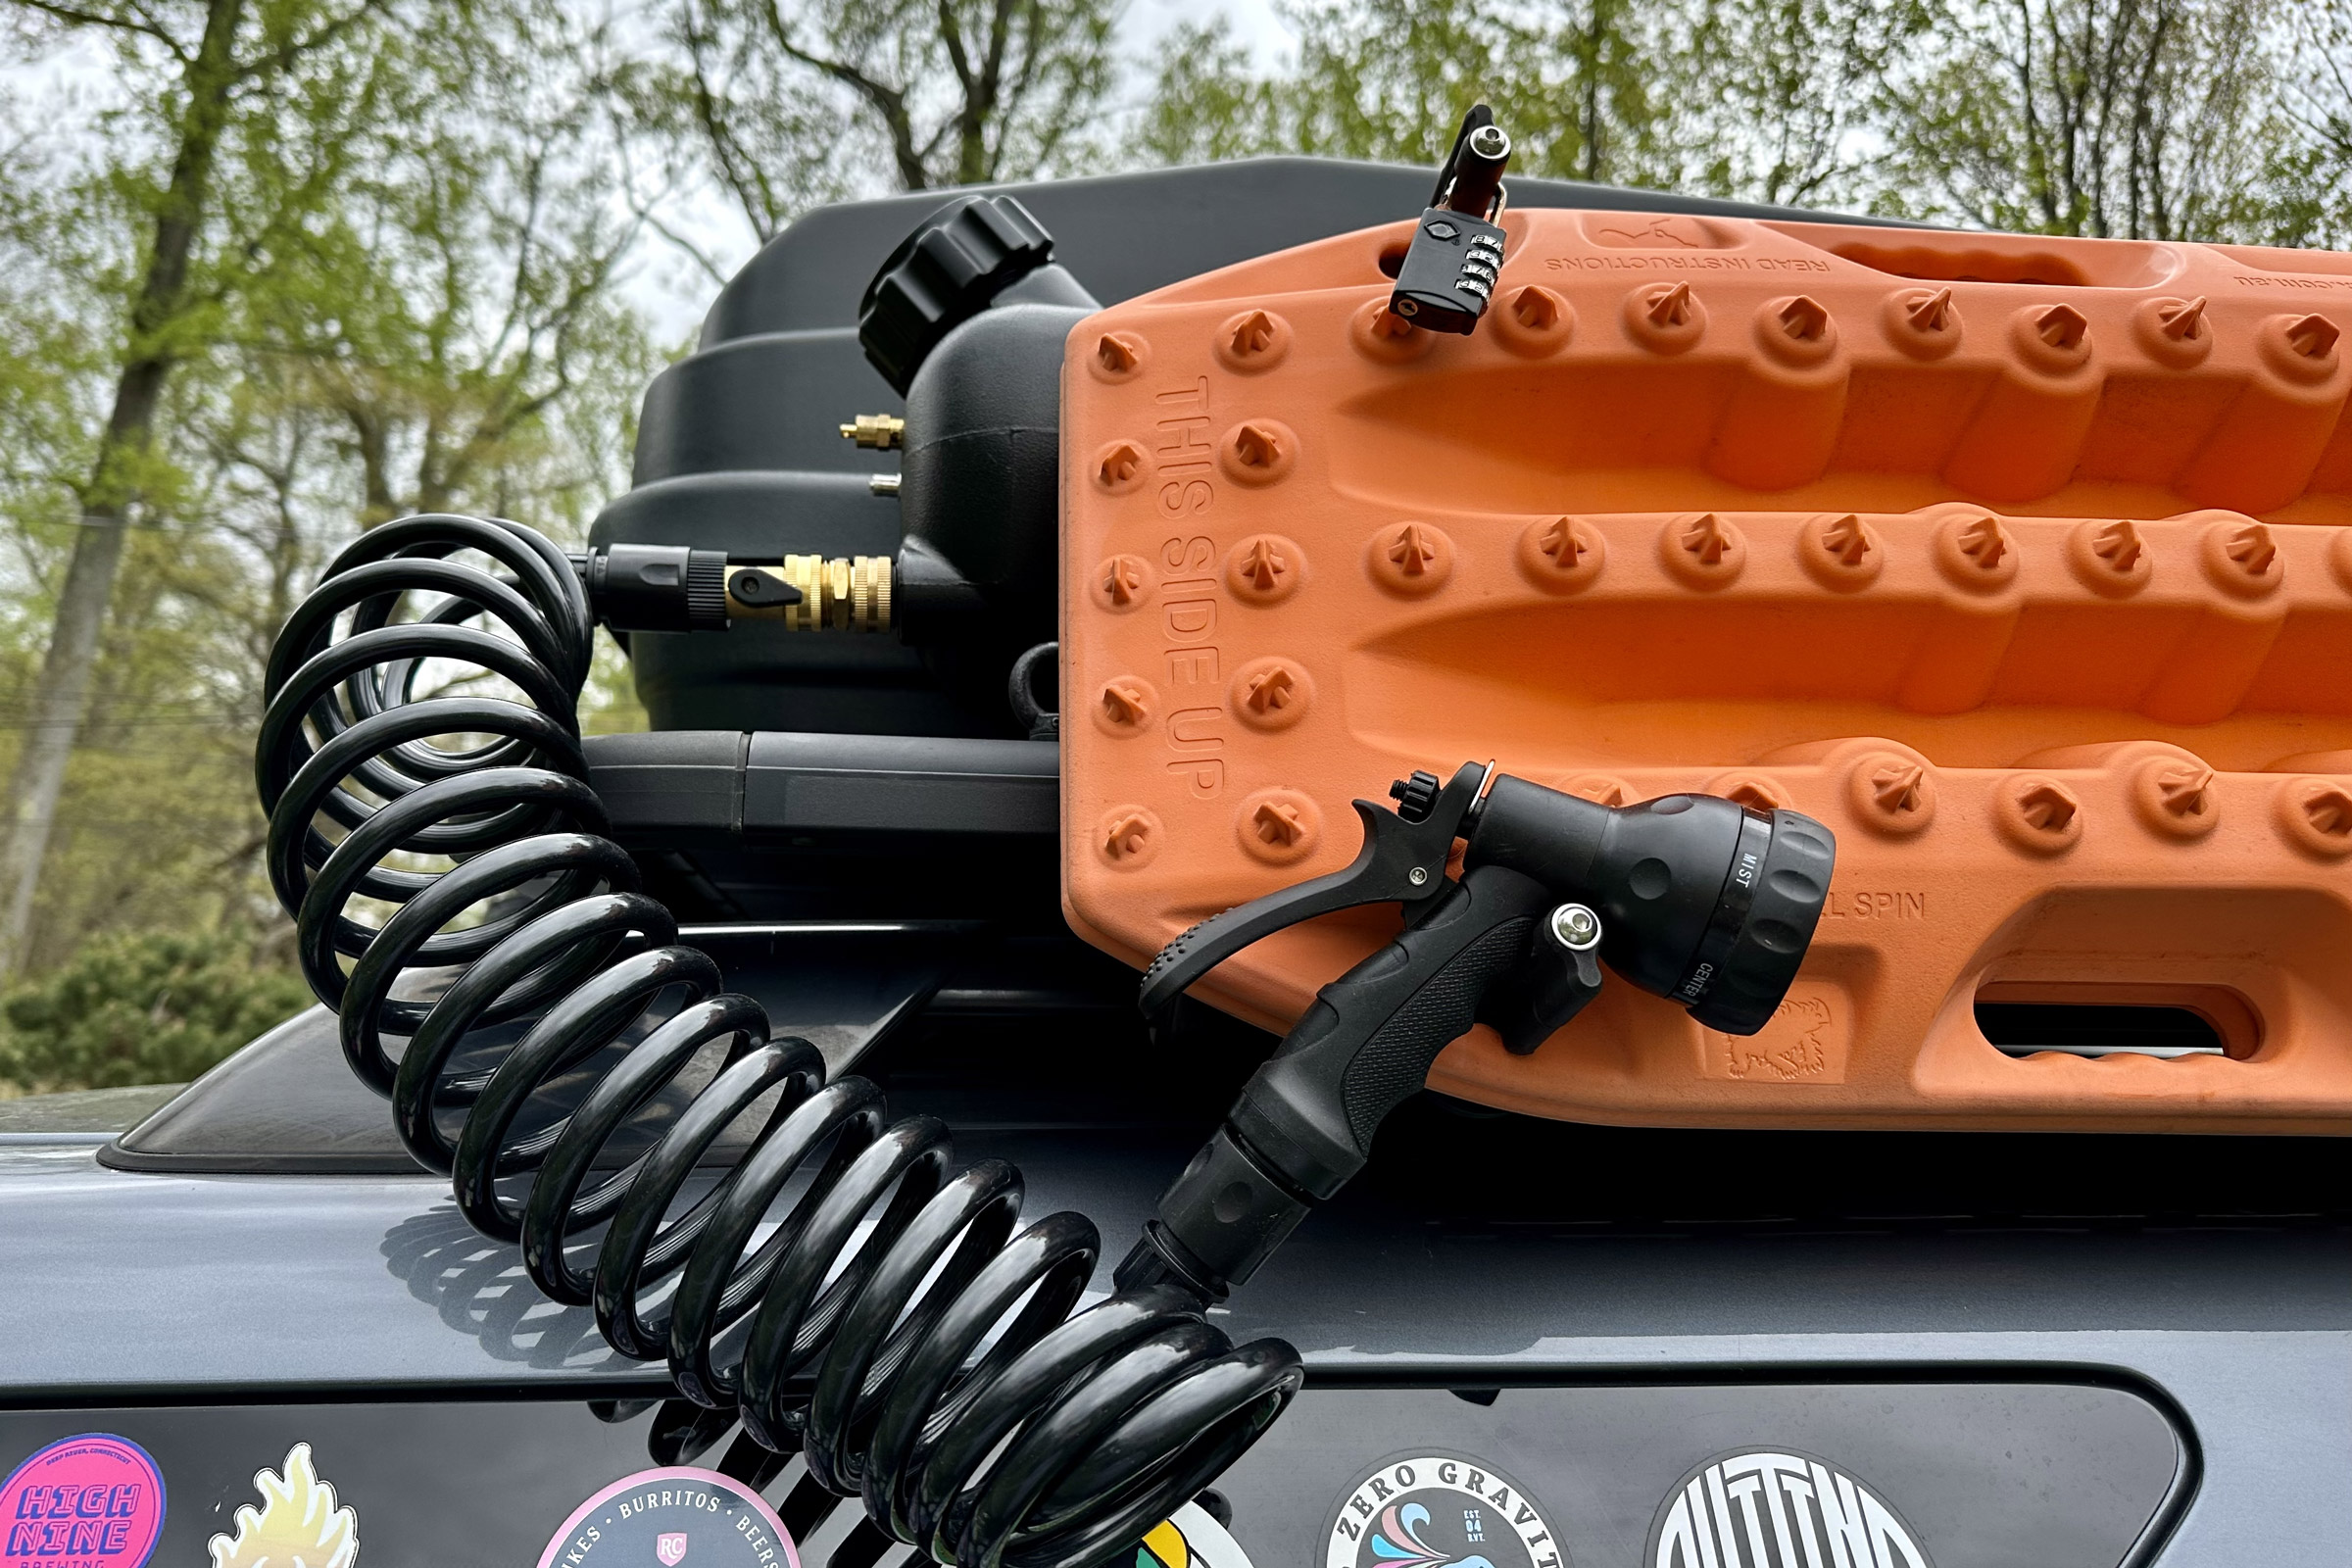
Filling the tank is as easy as screwing on the included fill valve and connecting it to a garden hose. That will both fill and pressurize the tank. This makes things convenient out on the road as almost everyone has a hose attached to their home or business.
But in those times when you’re out in the boonies and you need a fill, you can either pressurize the Weekender with a bike pump or purchase their pump cap.
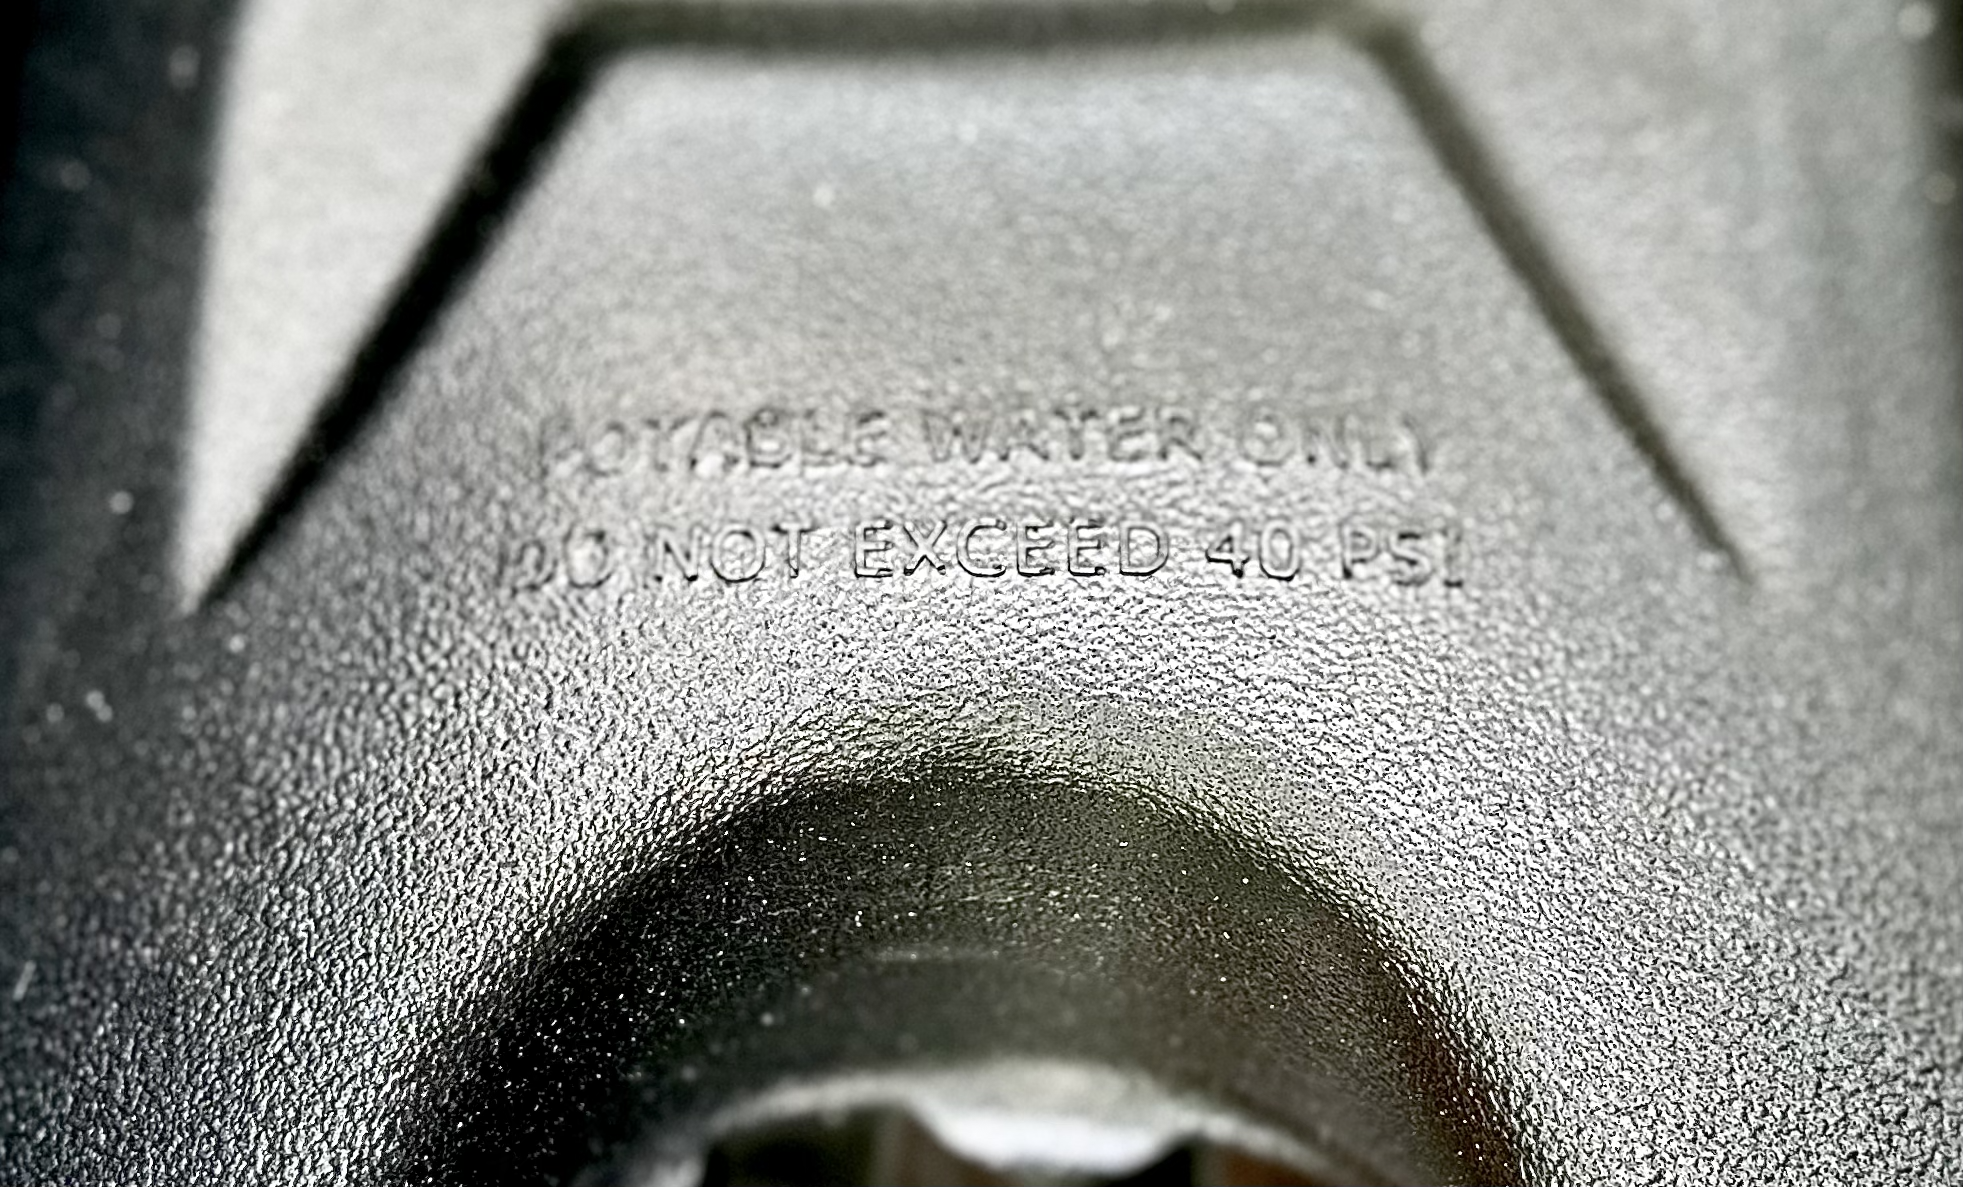
Keep in mind, you should only put clean, drinking water into the vessel. The last thing you need to be driving around with is the magic elixir that leads to a zombie apocalypse churning around up there.
WaterPORT Use

The Weekender comes with a 16-foot coil hose with a quick-connect high-pressure nozzle that has five different settings. I won’t go on record and say that this nozzle puts out the same pressure as my shower head at home, but it’s up there. This makes cleaning grime off your gear and filling water bottles less of a chore and makes cleaning the grime off your body a luxury.
I disconnect the hose and nozzle when I’m traveling, but WaterPORT does make a nozzle holder. It can be left in place to hold the nozzle during travel or angle it just right for those roadside showers. I didn’t pick up this accessory, but now that I am obsessed with taking random showers on the side of the road, usually after a grimy hike, I might just.
For those hopeless romantics out there who don’t mind taking their time, there’s a premium shower/sink kit. This kit is truly hands-free and motion-activated. It’s too rich for my blood, but I see it as a nice upgrade for those folks who enjoy their creature comforts.
WaterPORT Accessories & Parts
One thing I really like about WaterPORT as a company is its wide selection of replacement parts. Shit happens and when it does, it usually happens when you’re out there in the middle of nowhere.
WaterPORT’s accessories page offers everything but replacement tanks. The rest of the stuff you would need can be picked up at a hardware store, but I don’t see anything breaking down anytime soon. I do, however, see people driving into their garages and whatnot, so again, this is worth mentioning.
The Freeze Factor
The downside to the WaterPORT Weekender, or any type of water vessel you mount on the outside of your vehicle, is that the water will get wicked hot in the summer and will freeze in the winter.
To minimize the possibility of sous vide-ing yourself at camp, I recommend parking in the shade or covering the tank so that the water maintains a reasonable temperature.
In the winter, I recommend directing the hose inside your vehicle and running the tap at a trickle. This isn’t a foolproof method, but it’s worth a shot, and you get to fill up your water bottles without stopping.
WaterPORT Weekender: Conclusion
If you’ve chosen to live the life of a vehicular nomad, you might be saving a bunch of money on rent or a mortgage. So, investing in something like the WaterPORT Weekender shouldn’t be too big of a deal if you’ve planned things out right. But if you’re a younger person just starting out in this kind of life, or you don’t have a bit of savings, an investment like this is something to consider before just buying one.
I’ll tell you right now — if the water wasn’t drinkable, this would be a luxury at best. But being that you can have 8 gallons of drinking water riding around with you makes the Weekender a necessity for anyone out there for long periods of time.
That’s my professional opinion. I come from the “self-rescue” and “self-sufficient” train of thought — especially now that I have to care for two little girls. For folks staying on the open roads, finding water is easy. But if you’re out in the middle of some trail and you run into trouble, or you just want to stay out a little longer, the WaterPORT Weekender is the answer.
You get to stay hydrated and stay clean and might need to barter a bit when you get back into town to use someone’s hose to refill. But, ultimately, you’re on your own with the most valuable commodity at your disposal.
I Have to Say It: WTF, Yakima?
RoadShower hit the nail on the head when it named its, um — RoadShower, the “RoadShower.” In fact, ever since Yakima bought them, it’s still just “RoadShower” to the people you talk about RoadShowers with when you’re out and about. Even with a WaterPORT Weekender mounted to the roof of my truck, I have to call it a RoadShower to get it to click.
But what the fuzz, Yakadoo? I understand you purchased the company — which was a smart move — but you didn’t see the need to upgrade it so people could drink the water out of it? I’m kind of bummed out about that, as your product is made from aluminum and might just outlast Willie Nelson!
Throw some BPA-free coating inside your tanks and make the water drinkable!

