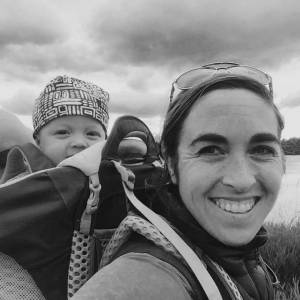
I went bike camping for 10 days — with a baby and toddler! This is the bikepacking gear we used for an epic family adventure on the Oregon Outback Trail.
This wasn’t the first time we’d gone bikepacking with our young sons, but it was certainly the longest and biggest adventure we’d bitten off to date. Ten days camping and biking is no small feat, especially with a 9-month-old and a 3-year-old in tow.
Luckily, me and my husband, Jason, have the same outlook on kids. We agree that they are very adaptable, and when it comes to their moods (especially the bad ones), nothing is constant. We figured as long as we kept reminding each other of this throughout the trip, we’d be OK.
Overall, we were able to keep our calm even when we came up against locked gates, roads that turned into nothing, and hills too steep to pull the trailer up. Thanks to our adventure race mindset, we met every obstacle head-on and, after a few deep breaths (and maybe a few cuss words under our breath), figured out another way.

5 Tips for Bikepacking With Kids
Whether bikepacking solo or heading out with the entire family, here are five tips to get you pedaling.
Prepping & Planning
Finding the perfect trailer was key for us being able to comfortably tow for long distances. For many of our smaller trips, we took our Thule Chariot. But for long hauls and bumpy roads, its width becomes an issue.
After doing some research, we found the Weehoo iGo Two — a single-wheel trailer with two seats. It was super easy to modify, and we were able to remove one seat and attach 9-month-old Revel’s car seat.
After a few tests we turned the car seat around so that the boys faced each other, and all of our lives instantly got better. Most of the time, there was nothing but giggles coming from behind us as the boys babbled back and forth.

Picking a Route
The next piece of the planning process was the route. We knew that we wanted to do the Oregon Outback Trail, but we wanted to make it a loop where we could start and end in Bend. So Jason got to work on Gaia and Orienteer.co and made us a loop where we could link up with the first part of the Oregon Outback outside of Klamath Falls.
The first part followed 200 miles of Jason’s made-up route (almost all dirt road). In the second 200-mile section, we followed the documented Oregon Outback bikepacking trail.
Food
Food is a huge factor in making any backcountry missions successful, happy, and healthy. Through adventure racing, Jason and I knew it was important our food be both light in weight and dense in calories.
This time, we had the added challenge of feeding our kids too. Max is a prolific snacker but picky at dinner and breakfast. And Revel eats more than all of us (seriously) but can’t yet have salt and is breastfeeding for only a small portion of his needs.
Luckily, we were able to snag some great meals from Adventure Eats, a local Bend startup. They even worked with us to create some no-sodium dehydrated baby food. Five days’ worth of organic baby food weighed in at less than a pound. And best of all, it was so good that Max would eat the leftovers!

Daily Flow
In general, we stuck to our roles and followed the natural rhythms of our home life. I woke up early and made coffee and breakfast.
Jason packed up the tent while I fed the kids and then we took turns getting the bikes ready while one of us played with the kids. Whoever wasn’t towing the beastly trailer was on kid duty — telling stories, delivering snacks as we rode, and keeping sunscreen applied.
On average, we could go for about 2 hours before they would ask for a stop. Our breaks lasted for an hour — full of yummy food and playing in the dirt so that when it was time to get back on the bikes, they were tired and ready.
We then would ride for another 2 hours, break again, and then continue as long as needed to get to our final camp.

Nearly every day, we all experienced “finish fever,” a phenomenon we know so well from endurance racing. The closer you get to the goal, the more emotionally draining each mile is.
We mitigated this for Max by creating a continuing storyline about his adventure friend “Zelda” that had left him a small toy and clue at each new camp. This was a lifesaver for us.
Once at camp, one of us would sneak away and hide a new little mini car. The other one would then get out the map, read the clues to Max, and take him on a little hunt to find his new toy. This activity, along with his new toy, would occupy him for the rest of the night, which gave us some time to set up camp, make dinner, and just be happily tired.
Backup Plans
Before we left, we put together a crew of folks willing to pick us up in case we needed it. We planned to go for as long as we could and wanted to complete the full loop back home. But we also wanted to make it fun and successful for everyone involved.
Nine days into our trip, we rode into a small town 80 miles from home. The temps were 90 degrees and rising, with no water supply or shade from that point on. Furthermore, a fellow bikepacker informed us that we had “25 miles of the worst sandy gravel riding on the whole route” coming up.
We discussed various scenarios over our melting convenience store ice cream and decided to call in the rescue. It was the best decision for everyone. Our friend came out with his bike, Jason drove the kids home, and I got to finish the loop with a good friend and no kids.
Bikepacking Gear
From bikes to camp lights, this is the gear that kept us going day after day.
Niner RLT 9 RDO: $6,600

I reached for my carbon Niner RLT 9 RDO gravel bike for this mission because the first half of the trip was full of unknown roads. Niner calls the RLT 9 RDO its “multitool bike” for its ability to tackle anything from rough gravel to dirt trails to smooth asphalt. And I couldn’t agree more.
The extremely light and stiff carbon frame coupled with the thoughtful tube construction made for a comfortable ride, even after 40 miles of towing the kids on rough, bumpy roads.
What’s more, it can take a range of different-sized tires, from super-skinny 650c x 28c tires to 2.0. The 26 mounts make this bike an amazing gear-hauler as well.
The XS frame made mounting certain handlebar and seat bags tougher due to tire rub, but I was able to mount fork and bottle cages as well as frame bags easily. The RLT RDO shines equally well across the board from high-end gravel racer to do-all commuter to expedition machine.
Shop NowRitte Satyr Gravel Bike: $4,999

No matter how good carbon bikes get, nothing beats the feel of an expertly built steel frame. The new Ritte Satyr was designed by the legendary Tom Kellog and definitely qualifies as “expertly built.”
While not designed specifically for bikepacking, the bike was a perfect mix of rugged and svelte. And somehow it performed equally well loaded down with an extra 150 pounds (gear and trailer) as when it was unencumbered.
It’s specced with the new and capable Shimano 1x GRX drivetrain and ENVE carbon fork, which made for a beautiful ride on both smooth and rough roads. The Satyr outshined the Niner on the 3-mile “highway to hell” section — an ancient paved road with consistent deep 3-inch cracks every 10 feet.
Best of all, buyers are allowed to choose their stem length, crank length, and 1x gearing allowing for a nearly custom bike.
Shop NowOld Man Mountain Racks: $160-232

Racks and panniers are necessary on longer bikepacking trips. And carrying gear for four on two bikes made this even more important.
But the huge variety of frame designs often makes it difficult to fit stock racks and bags. With Old Man Mountain’s rack and fit kit system, it’s nearly impossible to find a bike that the brand’s racks don’t fit.
The cleverly designed OMM pucks create virtual attachment points that allow for a very customized fit. We were even able to mount a rear rack on Jason’s bike that sat underneath the trailer’s attachment arm. This let us carry low-profile panniers from Revelate Designs and tow at the same time.
The racks are lightweight but super burly, with a limit of 70 pounds. We did a fun test with fully loaded racks (140 pounds total) and trailer with kids (85 pounds), for a total of 225 pounds added to the standard bike weight. It felt about as nimble as a tank but was actually very rideable.
Shop NowBikepacking Bags: $49-158

As adventure racers, we’re used to carrying a backpack for multiple days on end. But making everything we needed fit on our bike frame was amazing and freeing.
Apidura and Revelate Designs are among the best bikepacking bags of 2020 and are our top picks for both durability and versatility. Both of these brands held up to 9 days of nonstop abuse and still look good as new.
Because my frame is size XS and I needed to pull the trailer, my range of bags to pick from was scarce. And because Jason needed to be able to fit two racks and pull the trailer, his choices were also slim. But we were able to come up with the perfect combo to fit everything we needed.
From Revelate Designs, we used the Mountain Feedbag Handlebar Bag ($49), the Joey Down Tube Bag ($69), and the Nano Panniers ($150).
From Apidura, we used the Expedition Frame Pack ($118), the Expedition Saddle Pack ($158), and the Expedition Handlebar Pack ($129).
Shop Revelate Handlebar BagShop Revelate Down Tube Bag
Shop Revelate PanniersShop Expedition Frame Pack
Shop Expedition Saddle PackShop Expedition Handlebar Pack

Voile Ski Straps: $6-10

Before you embark on any bikepacking adventure of any sort, buy yourself a set of ski straps. These amazing straps make it so easy to strap anything onto your bike.
We ended up using these in place of many stock straps that come with bike bags because they’re so much more durable and easier to adjust. Also, having a few extra on hand is always a good idea for repairs.
Shop NowWeehoo iGo Two: $489

The iGo is the only single-wheel, two-kid trailer on the market. It’s also extremely affordable compared to most kid trailers. The seatpost mounting system is easy, bomber, and can switch between bikes with ease. And it will even work with some dropper configurations.
The construction is on the cheaper end. The seat back pockets and panniers are cheap-o quality and not suitable for heavy loads. But the actual trailer feels super solid, and the adjustability is really simple.
We heavily modified our trailer to suit our needs. We removed the pedals and one of the seats to mount a car seat instead. Things like shade/weather cover and kickstand are sold separately. They’re poor quality for what you pay but probably worth it for a long trip regardless.
If there were other options for a trailer like this out there, I’d be harsher on this one for its many shortcomings. But as it stands, there are none. And the iGo Two was perhaps the key piece of gear in making this sort of family bike trip possible and enjoyable.
Shop NowGoal Zero Venture 30: $100

We relied on our phone for our camera, GPS, and noise machine (for our 9-month-old). Being able to keep it and our headlamps charged up was super important. Enter the Goal Zero Venture.
It was lightweight, fit easily in my frame bag, and kept everything charged enough for 4 days of solid use. Plus, its waterproofness and durable build meant we didn’t have to pamper it.
Shop NowBioLite SunLight: $25

This light was a last minute add-on to our trip that proved to be entertaining for the kids and very useful for the parents.
In the evening, the kids loved to play with its “party mode” feature and watch the lights change color. Jason and I loved it for its soft light to read or do the Rubik’s Cube in the tent while the kids slept.
It was also super simple to recharge. We would just clip it on top of our rack or front bag, and it would be solar charged by the time we arrived at camp.
Shop NowRumpl Stash Mat ($69) & Junior Blanket ($49)

The lightweight, durable Stash Mat was another critical piece of gear for us. Because we often would break and camp in the middle of the forest, we didn’t have any picnic tables to eat on. This mat was the first thing to come out whenever we stopped.
And it became the kids’ eating mat, play mat, and was crucial for bedtime. It provided a blackout environment for 9-month-old Revel as he went to bed when it was still light out.
The Rumpl Junior Blanket was Max’s favorite on-the-go blanket. He loved covering his legs up and getting cozy with it on the chillier days on the bike. We loved it because it’s light, packs down super small, and holds up to dirt and heavy use.
Shop Stash MatShop Junior Blanket
MSR Thru-Hiker Mesh House Tent: $200

The MSR Thru-Hiker Mesh House was an amazing space-to-weight option for the trip. Designed primarily for trekking, the Mesh House packs down small and weighs just 1 pound 2 ounces.
And the huge floor space (nearly 38 square feet) was enough room for the four of us. Setup was a breeze, and it’s super easy to pair with the Wing Tarp ($190) for rain coverage.
My favorite was that it is equally easy to set up either the house or the wing first and then add the other in a flash. When the rain threatened, we threw up the tarp and then put up the mesh house underneath. And when the sky cleared later that night, the tarp easily came off so we could count the stars until we fell asleep.
Shop NowKatadyn BeFree Gravity 3L Filter: $70

In Central Oregon, water can be hard to come by. And because campgrounds were closed due to COVID-19, we had to be a little more self-reliant. With the BeFree 3L filter, this was not an issue.
Within minutes of filling our filter from the river, we could easily fill all our bottles and bladders. Toward the end of our trip, the filter did get a little clogged. But after a few shakes and jostles, it went back to flowing freely again.
Compared to other filters that are on the heavier or bulkier side, this one could roll up so small it easily fit in my frame bag for quick access.
Shop NowAdventure Eats Dehydrated Meals: $10-11 Each

The Jackfruit Jambalaya was one of the tastiest dehydrated meals of our trip. As a new player in the camp food market, Adventure Eats has a limited selection. But the meals that we tested were all excellent and kid-approved. They’re all gluten-, dairy-, and soy-free, so most people with dietary restrictions can eat them.
And we love that they’re made from local ingredients in small batches right down the street from us in Bend, Oregon. Best of all, the meals we tested are really tasty dry (seriously) and can be cold-cooked in about 90 minutes if you run out of fuel.
Shop NowKid Sleep Kits

Sleeping well on family adventures is key. And making it as light as possible is just as important. For our 3-year-old, we used a set of icebreaker 260 Tech base layers ($60), his beloved Big Agnes Little Red 15 Degree Sleeping Bag ($70), and a small Therm-a-Rest ProLite Sleeping Pad ($95) that fit perfectly in the sleeve of the sleeping bag.
For our 9-month-old, we used a Woolino Onesie ($30), a Morrison Outdoors Little Mo 20 Degree Down Baby Sleeping Bag ($160), and a third of a NEMO Switchback Pad ($40).
Both boys slept all the way through the night every night, and we had to wake them up every morning. And every night around 8 p.m., both boys would be excited to snuggle down. Max would even shout, “I want to get into my sleeping bag!” Hearing these words after a long day on the bikes was so exciting for us exhausted parents.
Shop icebreaker Base LayersShop Big Agnes Kids’ Sleeping BagShop Therm-a-Rest Sleeping PadShop OnesieShop Baby Sleeping BagShop NEMO Sleeping Pad
Just Go For It
Things didn’t go perfectly, but it’s worth getting out and going for it. If you’re looking for ways to get the family outside, start small. Go on an overnight camping trip nearby or hop on the bike for a few hours.
Look for ways to make it fun for the whole family and remember that bad moods and meltdowns will pass.

I’m not sure what adventure is next, but we’ll definitely be spending many more days on the bike and nights in the tent. And I hope you will too.