“I’ve been lacing shoes a special way like this for 23 years,” Brian Beckstead, Altra co-founder and de facto shoe-tying guru, told me. Beckstead, I learned, had not only made a career of perfecting how running shoes work — and fit — he’d gotten his start lacing up runners’ shoes working at the Runner’s Corner shoe store.
So, this reassured me I hadn’t pulled a few strings to speak with him for no good reason. Speaking with one another over Zoom, we were both looking at something I’d come across while perusing Reddit’s /r/coolguides — a trove of DIY guides and do-life-better infographics. It can be as helpful as “How to Tie the Strongest Knot There Is in Four Steps,” and as dubious as the “Guide to Cheesecakes from Around the World.”
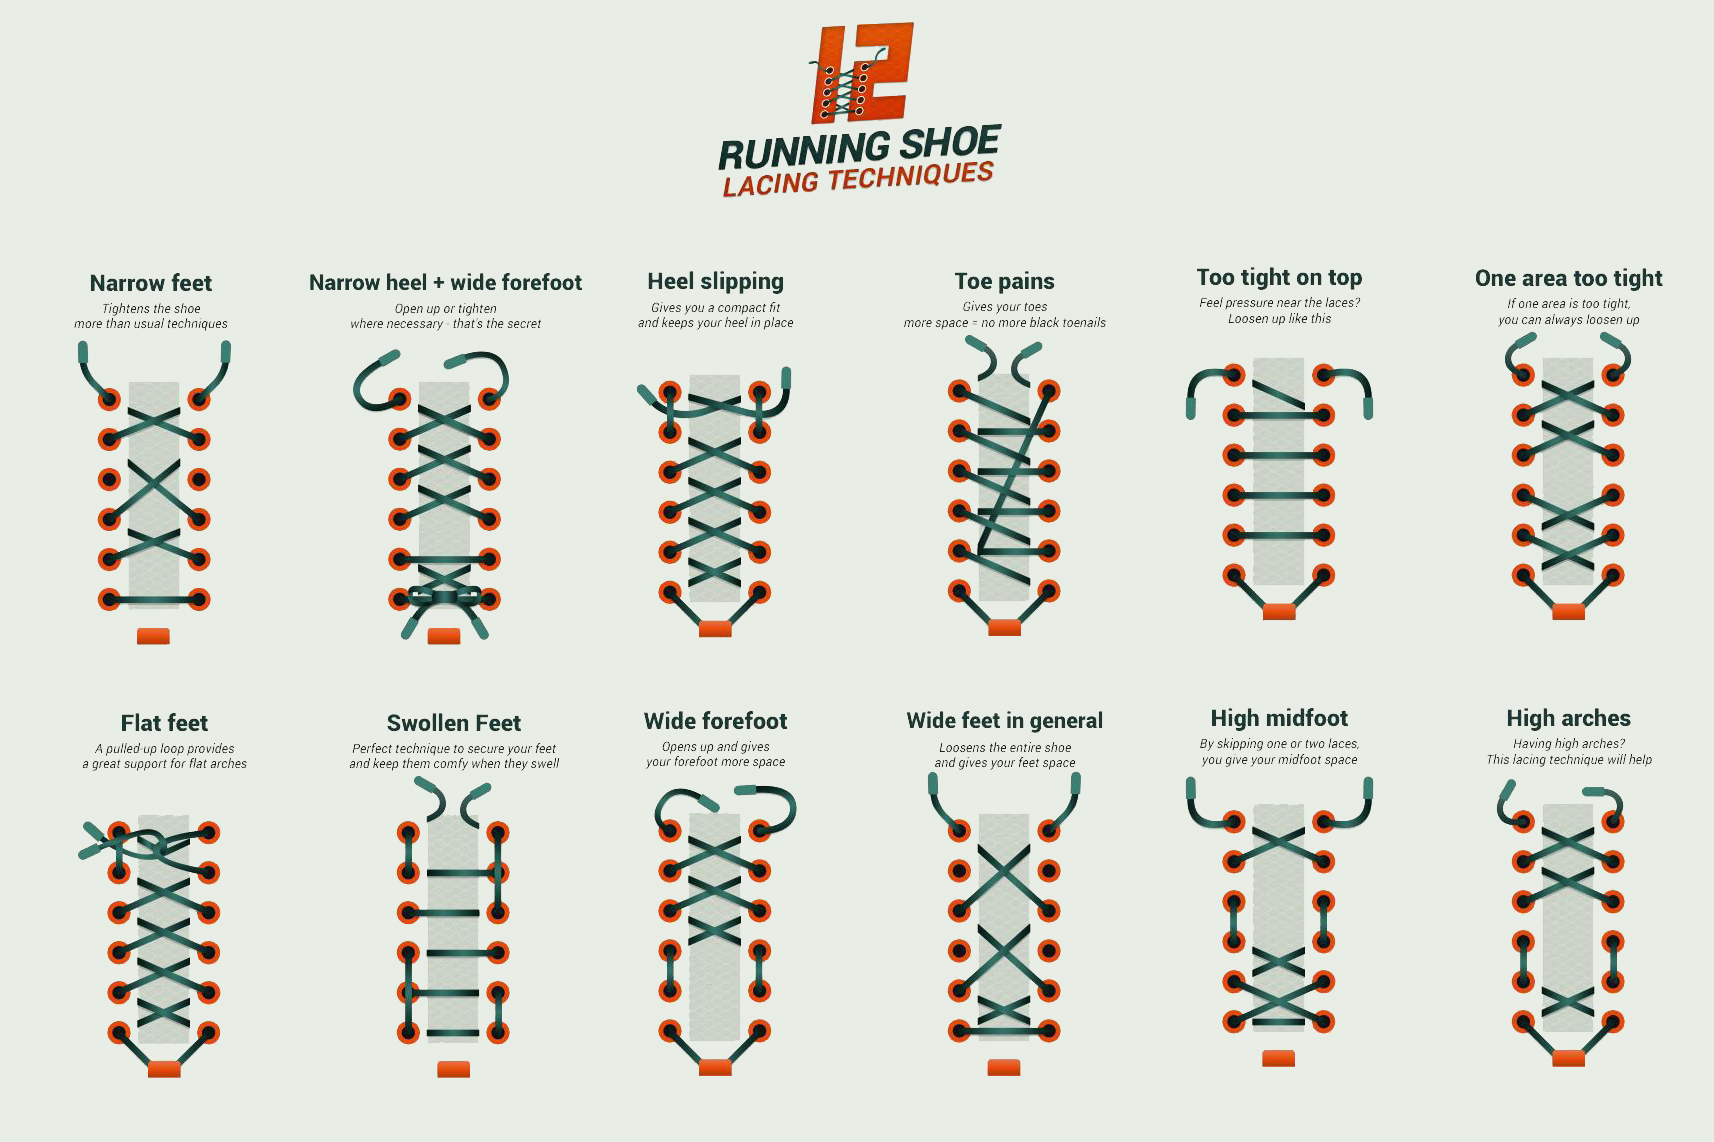
And when I showed Altra’s co-founder the guide titled, “12 Running Shoe Lacing Techniques,” I didn’t know which variety it fell under.
“This infographic is absolutely perfect!” Beckstead assured me. “I actually lace all my shoes with the ‘heel slippage’ technique,” referencing one of the 12 pictures on the graphic.
And this helpful chart wasn’t just lauded by Altra’s brass; HOKA even hooked me up with Zack Paris, the brand’s senior product line manager, to weigh in.
“This is probably the most extensive list of alternatives I’ve seen,” Paris said, impressed. “People generally look for the easiest solution — but there are so many ways to do it.” He even echoed Beckstead, citing the “heel slippage” option as the most common shoe-tying variation.
Take a look for yourself — see if any of the techniques represent a foot type that matches your own.
How to Lace Running Shoes
High Arch, Midfoot Test
I identify with the “high-arch” and “high-midfoot” variants, so I relaced a pair and went for a run. Anyone with a pronounced midfoot (often accompanied by a high arch) probably experiences soreness on top of the midfoot after long runs. I know I do.
As my feet swell during a run, the top of my foot starts to press against the tongue. With standard, out-of-the-box lacing, there just isn’t any give, and the foot suffers.
By lacing them by skipping one or two crisscrosses, the tongue has room to push outward. And I’ve noticed my feet don’t hurt as much.
Of course, there’s a downside. In addition to adding some breathing room, my modified lace system also introduces more play in the shoe overall. That said, this is not egregious. And I can leave my gnarly trail shoes laced more for security.
Blisters? Try the ‘Heel Lock’ aka ‘Runner’s Loop
Another helpful lacing trick is the Heel Lock (also known as the Runner’s Loop). This technique actually demonstrates the reason for the very top eyelet, which is often left unlaced on most shoes.
As the name suggests, the Heel Lock will help prevent slippage, which can cause blisters along the heel. To do this, lace up through the inside (tongue-side) up to the second eyelet from the top. Here, switch direction and feed the lace back through the top eyelet on the outside of the same side of the shoe (i.e., don’t crisscross laces). The image below illustrates this.
Before you pull it tight, cross the laces over the top of the tongue once more and pass them under the new loop on the outside of your shoe. Pull it tight, and you’ve got a Heel Lock!
Which Technique Is Right for You?
Of course, both Beckstead and Paris agreed that runners should absolutely play around with their lacing technique — just not on race day.
“Try out lacing one shoe laced one way and another way with the other — for example, one ‘high arch’ and one ‘wide,'” Beckstead said. “Experience and experimentation will help.”
And if you’re uncertain which option(s) you should try, both experts point to the surest way to find out.
“Wherever there’s pain,” Paris said, “focus there first.”
‘Window’ and ‘Parallel’ Lacing

Generally speaking, you’re not limited to crossing laces after each eyelet. So, if you notice tightness, pressure, or pain in a certain area, you can either create more space by lacing vertically (window lacing) instead of over the tongue or lace horizontally (parallel lacing) to provide just a little more give than diagonally.
There’s no hard and fast rule here. If you have discomfort from your forefoot up to the top of your foot, try parallel or window lacing in that specific area.
There are even lacing techniques to prevent the infamous dead, black toenail — unless you consider that a badge of honor. It’s all about finding the right combination of comfort and security and accommodating your unique physiology.
FAQ
That top eyelet that never seems to be laced from the factory — that’s for your Runner’s Loop (also known as “Heel Lock” lacing). When you feed your laces back through this eyelet, it creates a loop on either side of the shoe. When you cross your laces over the tongue, pass the ends through this loop on each side and pull tight. You’ve now locked your heel in place to prevent slipping and blisters!
Whether you experience numb toes or feel like your shoes are always too tight, two lacing options exist to address this. If you notice tightness or soreness in a specific area, like your midfoot, try window lacing in that spot. Window lacing is simply feeding a lace up the eyelets along one side instead of crossing over the tongue.
If your shoes feel tight most or all of the time, you might consider parallel lacing instead of the standard crisscross style. It takes some practice, but it isn’t difficult once you have the correct start.


